1st Lecture Flowers And Leaves
View more presentations from buddy.tignor.
 Sailboat and Sunrise Too Far Away © Jim Miotke 2005 All Rights Reserved |  Sailboat and Sunrise Becomes Better by Moving in Closer © Jim Miotke 2005 All Rights Reserved |
Each time you spot a subject, snap a shot and then move in closer for a better shot. Having your subject almost fill the frame helps your viewer understand and appreciate your photo. Also, details are often more interesting than an overall view.
Keep moving in closer until you are sure the photo will successfully represent your subject.

Suzy
For This Pic, I Had to Shoot Quickly
© Jim Miotke 2005
All Rights Reserved
Practice getting quicker and quicker to the draw.
Do not worry about taking too many pictures and do not wait until you're absolutely certain all the knobs and buttons are in their correct position.
As the motto of one of BetterPhoto old t-shirts states, "Shoot First, Ask Questions Later."

Touch of the Past
Balanced Composition
© Jim Miotke 2005
All Rights Reserved
Strive to lead the eye along an interesting path through the photo, with the use of strong lines or patterns.

Detail Photo of French Breakfast
© Jim Miotke 2005
All Rights Reserved
Then be sure to keep anything that would distract out of the picture. Go as far as Ansel Adams did to remove unwanted elements.
The easiest way to do this is to watch your borders - the edges of the view you see through the camera's viewfinder. Then recompose if anything - such as an unattractive telephone wire, an old soda can, a distracting sign, your finger, or your camera strap - hangs into your picture.
It can become more difficult if you want to, say, shoot a San Francisco cable car without a single distracting telephone line. But even in such a difficult case, you have many options.
You can:
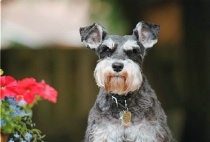
Heidi
Focusing on Your Subject
© Jim Miotke 2005
All Rights Reserved
Practice shooting with different apertures and monitor the results afterwards to learn how depth-of-field affects your photo.
You will find that a smaller depth-of-field (and smaller f-stop #) focuses all the attention upon your subject. This is great for taking a picture of your child, your dog, or your husband - subjects stand out against a blurry background.
Likewise, you will find that a greater depth-of-field (bigger f-stop number) will make everything from here to eternity appear in focus. This will help make those landscapes fascinating and lovely.
 Pool at Hearst Castle Using Deep Depth of Field © Jim Miotke 2005 All Rights Reserved |

Snoqualmie Falls
Shooting with a Slow Shutter Speed and Tripod
© Jim Miotke 2005
All Rights Reserved
One image happens so slowly that we could never see it and the other happens so quickly in real time that we would never notice it. Play with shutter speed!
Use a slow shutter speed and a tripod to make a pretty picture of any creek or stream. On the other hand, you can use a fast shutter speed (1/500 and up) to capture an object in motion.
Combining a fast shutter speed with a long lens, you sports buffs can get a trophy of your own when you are able to catch the expression on your favorite runningback's face as he slips past the final defense toward a winning touchdown. Remember, catching the moment in fast-paced action photography may take a little more practice so hang in there.
 Empress Hotel at Sunset © Jim Miotke 2005 All Rights Reserved | |  Portrait at Sunset © Jim Miotke 2005 All Rights Reserved |
By this, I don't mean look into the sun - no, that won't do at all. But it is good to see what kind of light you are working with. Which way are the shadows falling? Unless you want a silhouette effect, where your subject is black against an interesting background, it's generally best to shoot with the sun behind you.
How is the light affecting your subject? Is the subject squinting?
Is the light blazing directly and brightly upon your whole subject? This works well if you are in love with the bold colors of your subject.
Side lighting, on the other hand, can add drama but can also cause extreme, hard-to-print contrasts.
Lastly, indirect light can be used to make your subject glow soft and pretty.
 Carmel Mission Clear Blue Skies and a Polarizing Filter © Jim Miotke 2005 All Rights Reserved |
If it's overcast, simply keep the sky out of your pictures as much as possible. This is usually the best way to avoid both muted tones in your subject and washed-out skies in your background. You might also find black and white pictures of an overcast day more pleasing than color.
When the day is beautiful, go ahead and make the most of it.
If your camera allows for the use of filters, purchase a polarizer. This will help you render deep blue skies against bright white clouds, richly contrasting colors, and other wonderful effects with a simple twist of the wrist.
 Typewriter Sometimes the simplest of tools work the best © Jim Miotke 2005 All Rights Reserved |
This doesn't necessarily mean keeping your camera set on "Program" - while this mode may be perfect in its simplicity, it may be frustrating in its tyrannical control.
Instead of relying on a fully automatic program, pick a simple, semi-automatic program such as aperture-priority and master shooting in that mode. Then, you'll be able to control certain basics without letting the other basics control you, and thus keep that 150 page manual where it belongs - in your camera bag.
Tip: if you want one accessory, bring a tripod. This one item can solve camera shake issues and help you get beautiful evening shots.
If you’re familiar with the area where everyone will be together, it’s a good idea to think ahead to come up with the best locations to take the photos and how you want everyone to position themselves (more on this in a moment).
It’s also a good idea to plan your group photos for the beginning of the event when everyone is looking their best, isn’t hungry or too tipsy. Alternatively, if you prefer the glassy look in people eyes and goofy grins resulting from a few hours of social drinking, plan to take your group photos after the event’s meal, when people aren’t anxious to get the photo shoot over because their bellies are rumbling and the kids are cranky from lack of food.
Planning ahead also means you should be sure your digital camera’s batteries are fully charged. Nothing is worse than getting everyone prepared for a group photo session and then finding that your camera won’t turn on or dies part way through.
Don’t line your group up in a long row, squaring them shoulder to shoulder. For starters, it’s an unnatural way to stand and will make people feel silly. Second, the results will be that your group photo looks like a criminal line-up.
Try to cluster everyone together nicely. Tall people should stand behind those who are more vertically challenged. Likewise, those who carry a little extra insulation will probably appreciate being placed behind other people (plan these arrangements in your own head, failure to do so may result in a broken camera or busted nose).
If you’d like to emphasise certain people, perhaps the hosts of the party or guest of honour, place them in the middle of the group. This will make them the focal point of the photo.
Try not to have people in the front be too far away from the people in the back. Aim to have everyone near to the same distance away from the camera; otherwise some people in the photo will be out of focus. If you absolutely can’t avoid having a distance between everyone, try using a smaller aperture.
If you’re shooting in lowlight conditions, consider increasing your camera’s ISO settings. Keep in mind that when the ISO is increased, your photos may result in more noise (grainier photos). Also, because higher ISO means quicker shutter speeds, it’s imperative that you avoid any camera shake or you’ll be looking at blurry, out of focus group photos.
There are several techniques you can follow when composing a photograph. However, when composing a group photo, here are three that you should definitely consider:
Taking several pictures in a row or using your digital camera’s burst mode will increase the chances of getting a great group photo. Another obvious thing to do - but not everyone does - is to take many, many photos. The days of digital mean we don’t have to worry about film and the cost of developing photos, so take advantage of it! The more lottery tickets you buy the better chances you have of winning. The same rule applies when taking photos; the more you take the better your chances are of getting the best group photos!
To capture fun group photos, follow these steps:
Another trick is to count down from three, but snap the photo when you get to two. If you leave it until you get to one, people have had the time to perfectly pose their fakest smile, get distracted by somebody else in the group causing them to look away, or by the time you get to one somebody is sure to blink.
If your group photo consists of children – or immature adults for that matter - that just aren’t listening or are trying to goof off (are rabbit ears even funny anymore?), tell them that if they cooperate and help by posing nicely, you’ll take some goofy photos afterwards where they can pull whatever faces they want, without their parents snapping at them for doing so!


 Kuala Lumpur Time
